Friday, February 25, 2011

Times.


Today I am starting to move into the studio! It couldn't be a more blustery day out, but whatever...still making the move. It's been a long time since I've been this excited about something.

I drew this last night, playing with emotions and color. Kind of like a hopeful beginning with mixed feelings. Life has already directed me to a different path.


Tuesday, February 8, 2011

Studio!

A few friends and I are going to be renting a studio space at the Hungerford Building on Main St. I am super excited for this because it is going to obviously make me more productive with my art. My friend and fellow Dad's mate, Greg is going to be using the space for tattooing. So, if anyone is interested in some pretty sweet tats, he has a really awesome illustrative style. My friends Jehenna and Raven will be moving in as well. Raven paints street-art inspired psychedelic paintings and Jehenna paints with wonderful textures and also blows glass. Another sweet deal is that we are moving right across from Carla, Fawn and Caitlyn! I'm excited for our little art community.

Well, I must get back to subbing. I'm at Penfield Bay Trail Middle School today for art. We're making Paper Mache Pacific Northwest Indian masks.


Monday, February 7, 2011

New merch and Hearts and Crafts

This past week I tried a new printing technique. I wanted to try transferring some drawings to wood. I read that caulk (the stuff you use to fill in cracks in tubs, floors, etc.) makes a really good transferring medium (just make sure you have good ventilation). You paint the caulk on the object you want a printed image transferred to and then burnish the paper onto the surface. I found that colored ink did not work, but both black inkjet prints and xerox prints worked pretty well. The xerox print turned out darker.


Xerox/laser transfer


Inkjet transfer


The laser transfer came out darker, but I also like the line quality and subtleness of the inkjet. I definitely will use both, depending on the color I paint the wood.

Today was the second winter Hearts and Crafts at Javas. Fawn, Madeleine and I did pretty well. The show was a great turnout. There was a surprising amount of children (I noticed that the mailer included that there were toys for sale). Awesome, because I try to make things that would appeal to kids and adults. Fawn's boss's son bought one of my ravens. That made me happy.

Anyway, here are some photos from our display:

Wednesday, January 26, 2011

Sketches

These are a few recent sketches. Some may be used for some upcoming paintings.
I am going to try to paint on wood. I will definitely be documenting it, so look for some posts in the near future.

design study

preliminary sketch idea for painting


girl head studies


Friday, December 10, 2010

Eggplant Parmesan

One of the first meals, and most desirable, that I learned to make is Eggplant Parmesan. This meal has its traces back to the old country (Italy) and can be found on many menus around the world. Some of you may be wondering how on Earth you make this delicious meal, others may already know. Regardless, I am providing you with the recipe I use when I make my Eggplant Parm. I’m convinced it is probably the best based on the reactions of friends and family. You may disagree. Either way, here you go:


Eggplant Parmesan

This is the recipe if you are planning to serve four, if you are serving two, cut in half

Ingredients:

1 largish eggplant

3-4 eggs

Olive oil (you will need kind of a lot)

2 cups of breadcrumbs (or however much you need)

Parmesan cheese/shaky cheese

Some mozzarella or provolone cheese (whatever you have or prefer)

Your favorite tomato or marinara sauce

Your favorite pasta (optional)

1. Cut the eggplant into thin slices

2. Coat the eggplant in egg, and dip into the breadcrumbs, put aside on a plate

3. Heat large pan with olive oil on medium, arrange eggplant on the pan, and let fry until they start to get oily/dark. You might want to check the underside. It should only take about two minutes, then flip and fry the other side. You may find that your pan gets dry, this means you need to add more oil, and otherwise the slices get too dry and will burn. You will need to add oil every time you fry a new batch of eggplant.

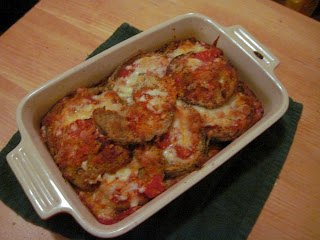
4. Coat the bottom of a baking pan with sauce; begin layering eggplant slices, with sauce in between each layer. On the top layer, sprinkle parmesan and mozzarella cheese.

5. Bake at 350 degrees for 20-25 minutes

6. Boil some pasta

7. Put eggplant over pasta you have a delicious Italian meal

Monday, September 20, 2010

This Weekend


I got to participate in Artist's Row at the Rochester Public Market Sunday thanks to my dear friend Fawn, who let me share her space with her. The turnout was great! I sold a few things, including one of my favorite pieces that I was a little partial to (above), but happy to know that someone will enjoy it as much as I have. It makes we want to just keep making more things...that's a good sign!

I also got to hear/take part in some great live music shows at the Rochester indie fest this weekend as well. I have so many talented friends. Overall, a pretty awesome weekend. It ended with seeing of Montreal in Buffalo, which I cannot even begin to describe...and now I am off to bed.


Wednesday, July 21, 2010

new art


These are some things I have been working on lately.

The Raven bird is made out of sculpey, painted with acrylic paint and varnished. The cathead guy is a collage where I took an old 19th century photograph (one the used to hang in good old Scrote Manor), and gave him a cat photo head. I played around with the background a lot...I guess I'm pleased with it now.
I will be making multiples of the ravenbird and finding more pictures to collage to make more of these animalhead people.